

In many cases, cheap ambient air temperature sensors are fine. However, it’s possible to save a good deal of money on electricity and gas through the use of more accurate sensors. This post breaks down the cheapest, most accurate temperature sensor build I’ve found so far.
In most homes, the temperature readings come from the thermostat(s) on the wall. Depending on where these devices are located, this may be more or less useful. Consider what happens in the case of our snowy-cabin to smart home retrofit. Thermostats are located in the center of the room, but the water pipes are the walls along the edge of the room.
Without accurate ambient air temperature sensors located along the walls, we’d have to guess the temperature along the walls. This usually leads to setting the thermostat quite high, wasting propane in attempts to keep the room warm.
When nobody is home, this means setting the temperature exceptionally high just to be sure the pipes don’t burst.
Instead, we placed a number of $20 sensors along the walls the house for much more accurate readings.
Ambient Air Temperature Sensors
Good sensors are expensive.
The post on building a DIY HVAC system used a DHT-11 and DHT-22 heat sensor, which can be purchased for just a couple dollars each. The former is accurate to within a few degrees F, or about one degree C. It’s also prone to jump about erratically (which is why the post called for some smoothing of the data).
For accurate temperature and accurate humidity sensors, the best option I’ve found is the SHT31-D:

The SHT31-D sensor is accurate to ±2% relative humidity and ±0.3°C
I also tried out a BME-280. It sacrifices a little accuracy (humidity ±3%, temperature ±1.0°C) and costs a bit more, but adds an altitude sensor:

All of these can be used as indoor or outdoor temperature sensors, but be careful to check the rating on the Arduino board to ensure it can withstand the temperature ranges.
When using these sensors around the house (such as for an air conditioning system or HVAC/heating system), temperature alone may not be good enough. As anyone who lives in a very humid (or very dry) climate can tell you, the relative humidity of the air has a big impact on how hot it feels. That’s why there’s something called the “Heat Index” in weather — which uses humidity to approximate what the temperature really feels like. If you’re planning on using the sensor for this reason, you can use this JavaScript code to calculate the heat index from the temperature + humidity values. This will create a more accurate ambient temperature sensor, leading to a more comfortable heating/cooling system.
Which Arduino Board?
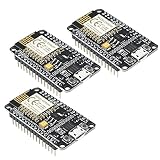
For just a sensor, the ESP8266 is sufficient — it has built-in WiFi and is powered via MicroUSB, making it easier to work with than some other cheap (UART) boards.
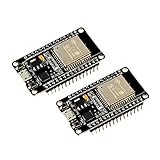
If you want to add some other features, or need Bluetooth and/or more processing power, the ESP32 is the IOT standard:
A warning: the sensors require an I2C connection. Both of the boards above will have no problem with this. However, I did have problem with some other boards, especially those that have built-in screens.
Making a Smart Temperature Sensor
Combining an ESP8266 with a SHT31-D is simple.
The Adafruit website provides sample code for all of their products.
Use the link above for wiring of the SHT31-D.
The following Arduino code will create a HTTP server that responds with the current temperature and humidity. It also uses a static IP address and provides mDNS, so the sensor is discoverable on the local network as esp-sensor. You will need to adjust the settings at the top of the file to match your network:
#include <Arduino.h>
#include <Wire.h>
#include <ESP8266WiFi.h>
#include <WiFiClient.h>
#include <ESP8266WebServer.h>
#include <ESP8266mDNS.h>
#include "Adafruit_SHT31.h"

const char* servername = "esp-bedroom";
IPAddress staticIP(192, 168, 0, 151);

const char* ssid = "****";
const char* password = "****";

const int led = 13;
const int i2c = 0x44;

IPAddress gateway(192, 168, 0, 1);
IPAddress subnet(255, 255, 255, 0);
IPAddress dns(8, 8, 8, 8);

Adafruit_SHT31 sht31 = Adafruit_SHT31();
ESP8266WebServer server(80);

void setup() {
  Serial.begin(9600);

  while (!Serial)
    delay(10);

  Serial.println("SHT31 test");
  if (! sht31.begin(i2c)) {
    Serial.println("Couldn't find SHT31");
    while (1) delay(1);
  }

  WiFi.disconnect();
  WiFi.hostname(servername);
  WiFi.config(staticIP, subnet, gateway, dns);
  WiFi.mode(WIFI_STA);
  WiFi.begin(ssid, password);
  Serial.println("");

  // Wait for connection
  while (WiFi.status() != WL_CONNECTED) {
    delay(500);
    Serial.print(".");
  }
  Serial.println("");
  Serial.print("Connected to ");
  Serial.println(ssid);
  Serial.print("IP address: ");
  Serial.println(WiFi.localIP());

  if (MDNS.begin(servername)) {
    Serial.println("MDNS responder started");
  }

  server.onNotFound(handleRequest);

  server.begin();
  Serial.println("HTTP server started");
}

void handleRequest() {
  digitalWrite(led, 1);
  float t = sht31.readTemperature();
  float h = sht31.readHumidity();
  String json = "{";
  if (! isnan(t)) {  // check if 'is not a number'
    json += "\"temperature\": ";
    json += (t * 9 / 5) + 32;
    json += ",";
    Serial.print("Temp *C = "); Serial.println(t);
  } else {
    Serial.println("Failed to read temperature");
  }

  if (! isnan(h)) {  // check if 'is not a number'
    json += "\"humidity\": ";
    json += h;
    Serial.print("Hum. % = "); Serial.println(h);
  } else {
    Serial.println("Failed to read humidity");
  }
  json += "}";
  server.send(200, "application/json", json);
  digitalWrite(led, 0);
}

void loop() {
  server.handleClient();
}
Fine-Tuning
The ambient air temperature sensor location makes a big difference.

If a patch of sun strikes an ambient air temperature sensor, it’s liable to jump ~5-10 degrees F. Sensors placed directly above heaters or radiators will be much more sensitive to changes from the HVAC system. Sensors in a windowsill may not accurately reflect the perceived temperature within a room.
We generally end up putting sensors inside of furniture of some kind. This


 6")

Hey, just curious how your battery life has been with this sort of project? If you actually have an idea of how long it lasted, I’m curious which combo of board/senor you went with
Thanks!
Not sure what you mean. There are no batteries in this project.