One of the most common questions when running a home server is: “how do I use a custom domain name?” Many users begin by editing /etc/hosts so that they can connect to custom-name.com. This post will go a couple steps further, making the custom domain name work for everybody.
The custom domain can be anything.
Inside the home network, at least. To access a home server from outside the home network, you must purchase the domain name.
If you’ve purchased a domain name, you know that you have to specify where to direct that domain name. For example, I use a custom script to update Route53 (Amazon’s servers) with the IP address of my home computer every minute. This is basically equivalent to running the popular OpenDNS at home, so any traffic from outside the network (elsewhere on the internet) knows how to connect to my home server.
The rest of this post will focus on making this also work inside the home network.
When you type a domain name in your internet browser, your computer goes through several steps in order to decide which IP address to connect to. Domain names are just a human-friendly way of referring to the address of a computer. So to use a custom domain name, one must find a way to tell the computer about this new name -> IP address mapping.
Using /etc/hosts
Unix systems have a file located at /etc/hosts.
This is the computer’s local override of the name to IP address map.
Assuming you have a server on the local network at 192.168.0.100, then all it takes to make the computer recognize custom-name.com is the following line:
192.168.0.100 custom-name.comAgain, this will only work for the computer connecting to the server…
Testing a Domain Name
Once a change is made, like the one above, it’s time to test.
Assuming that the server is running a HTTP server, the easiest way to test is usually curl -v — since curl is commonly installed, and the -v flag will output the IP address:
curl -v house.snowy-cabin.com
* Trying 192.168.0.100...
* TCP_NODELAY set
* Connected to house.snowy-cabin.com (192.168.0.202) port 80 (#0)
> GET / HTTP/1.1
> Host: house.snowy-cabin.com
> User-Agent: curl/7.64.1
> Accept: */*
>
< HTTP/1.1 301 Moved Permanently
< location: https://house.snowy-cabin.com/
< date: Mon, 04 May 2020 16:06:26 GMT
< server: http
< content-length: 0
<
* Connection #0 to host house.snowy-cabin.com left intact
* Closing connection 0
In this case, my home server responded to the HTTP request indicating a redirect to a https:// URL. This is expected, as I use Switchboard on the home server which enforces a SSL connection (more on that below).
Unfortunately, the change so far is rather superficial.
Let’s make it global.
DNS Servers
When there is not an /etc/hosts override, DNS Servers run the show.
A DNS server simply answers the question from above.
(“what is the IP address for domain name X?”)
To understand DNS servers, the dig tool is rather helpful. Debian users might need to install it (it is installed by default on OSX):
sudo apt install dnsutilsAt which point, you can use dig google.com. Consider this partial response:
;; ANSWER SECTION:
google.com.             6       IN      A       172.217.18.206

;; Query time: 1 msec
;; SERVER: 192.168.0.1#53(192.168.0.1)- ANSWER_SECTION: my computer will find google.com at
172.217.18.206. - SERVER: this response came from
192.168.0.1on port#53.
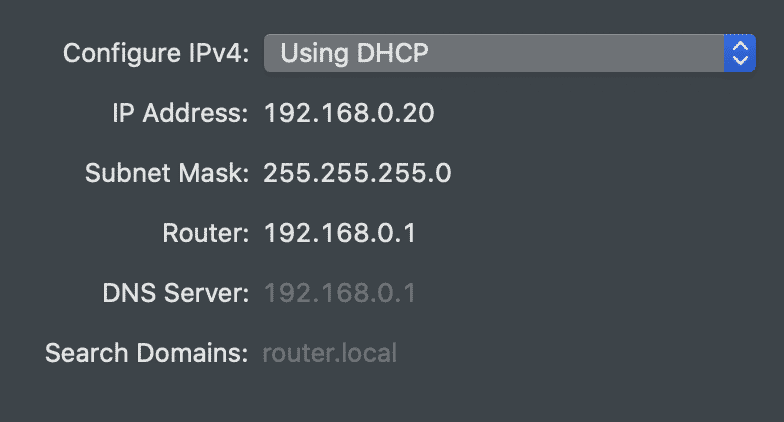
The server is, in fact, my Raspberry Pi router. Specifically, it came from a DNS server running on that router. On OSX, the Network Preferences pane hints at this configuration:

The key here is that the router tells every computer on the network which DNS Server to use. This means that we can install a custom DNS Server and thereby inject our own responses.
PiHole & AdGuard Home
It’s not hard to run a DNS Server.
There are plenty of ways to do so on a Linux machine, such as dnsmasq. You may also be interested in setting up Pi-Hole alongside dnsmasq. But there is also an easier way.
PiHole and AdGuard Home are two advertisement blockers that work very similarly. They are both DNS servers that deny access to known advertisers. The Home Assistant community moved to AdGuard because it is easier to use.
In either case, the trick is the DNS rewrites. Pi-Hole does in through dnsmasq, and Ad-Guard has a UI (Filters -> DNS Rewrites). After setting such a rewrite, I can dig house.snowy-cabin.com @192.168.0.1 (an example of explicitly setting the nameserver):
;; ANSWER SECTION:
house.snowy-cabin.com.  10      IN      A       192.168.0.100

;; Query time: 2 msec
;; SERVER: 192.168.0.1#53(192.168.0.1)
Et viola. The DNS server has responded with a local IP address for my home server, rather than the public address.
This enables one more interesting thing…
HTTPS
Now, HTTPS certificates are easier.
If you own the same domain that you have rewritten internally, as with my example in the last section, a different IP address is used publicly and privately. But the domain name stays the same. This means a reverse proxy (like Switchboard) running on the server can serve traffic over either IP (the public or private) via a HTTPS connection.
For help with that:


