

Dashcams (video cameras in cars) are a great security and safety feature. As with the rest of the vanlife IOT, I built my own DIY dashcam that has some unique features — like motion detection and automatic recording.
On its surface, this is a post about using the MotionEyeOS to create a security camera. However, it is also a segue into more advanced security concepts (like detecting humans+animals+faces, sending alerts, and more).
Check out the smart home retrofit for more DIY security.
This project also serves as a parked car security camera. It can run on on its own batteries for many for many hours after the car has stopped, and save recordings to an off-site server. This can help catch vandalism: the files are uploaded securely as soon as they are created. In our case, it was a vehicle/RV security camera.
DIY Dashcam Design
The dashcam needs to run constantly. When an internet connection is not available, it should record locally. When possible, it should upload the security footage recordings (and trigger any necessary alerts). There are, in effect, three modes of operation:
- Parked at home (connected to known WiFi).
- Driving or parked with cell service (connected to phone / local hotspot).
- Unknown location (disconnected).
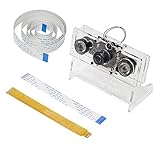
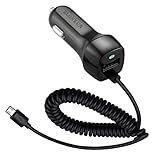
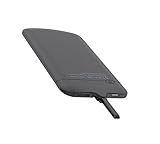
All this also means a battery backup is necessary. Of course, it all needs to run off the car’s power outlets as well (meaning a DC “barrel-plug” to USB adapter is required). Finally, a wide-angle, night-vision camera is necessary to capture as much as possible. The full part list is below, though your price tag may be less if you already have micro SD cards, batteries, etc. lying about:
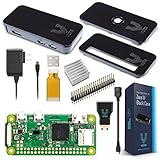
This design maximizes battery life by offloading all detection and processing to other devices. It would also be possible to substitute the Pi Zero W for a Raspberry Pi3 or Raspberry Pi 4. In this case, much more power would be used, but you’d be able to do the image processing on the same device (i.e., detect motion, people, etc.).
Setup
The easiest approach to turn the camera into a motion sensor for the car is to install MotionEyeOS on a Raspberry Pi Zero W. This versatile app is a very fast and customizable way to manage security cameras. With the MotionEyeOS dashboard up, there are plenty of settings to fiddle with. To maximize performance:
- Turn off all services except SSH.
- (Optional) enable overclocking in expert settings.
- (Optional) enable Fast Network Camera in expert settings.
The last option is the most significant. It improves performance, but sacrifices the ability to do motion detection or anything sophisticated on the device (more on detection below). The camera specs claimed 1080p @ 30fps, so I set the resolution to 1080×720:

It’s worth playing around with the different settings to see how each affects the picture. Other resolutions can actually add to the vertical coverage of the camera, for example:

Motion Detection
If the camera is not in Fast Network Camera mode, skip the next paragraph.
If the camera is in Fast Network Camera mode, a second MotionEye instance is required. For example, I run a second Raspberry Pi in the van already for the IOT server. From the other MotionEye instance, add a Network Camera and enter the IP address of the Raspberry Pi Zero W on port 8081. Something like: http://192.168.0.160:8081/. Now the camera will appear on the second MotionEye instance with all the requisite file-saving and motion-detection options.
MotionEye was (perhaps obviously) built for motion detection. The Motion Detection, Still Images, and Movies sections are all worth playing with. Each camera and setup will be different, but here are some general motion detection guidelines I’ve found:
- Changing sensitivity:
- more movement: Frame Change Threshold
- longer movement: Minimum Motion Frames
- Filtering unwanted changes:
- specific spots: Mask -> Editable (draw the area to ignore)
- major brightness changes: use Maximum Change Threshold
Images and movies are, by default, saved to the local disk. If you click on the camera in MotionEye, several tools pop up in the black border:

- FPS (lower-left) is in the format of streaming/recording
- Camera (lower-right) manually takes a still
- Image (top-right) opens files for review/deletion
Alerts & Advanced Detection
MotionEye also includes “notifications.” It’s pretty self-explanatory to set up a webhook or email to trigger some sort of notification when motion is detected. However….
Motion detection is only so useful.
The problem are the false positives. Even with an extremely well-calibrated MotionEye setup, all it takes is a stray leaf in just the right position to trigger a notification.
Security systems are only as good as their false-positive rate.
Alert fatigue causes humans to start ignoring notifications. Even a motivated observer of motion notifications will get tired.
The better approach is to detect objects of interest, like humans and cars. Such computer vision recognition has gotten surprisingly fast and easy to implement in recent years.
In my experience, the simplest approach to get good results is to:
- Keep the MotionEye sensitivity high.
- Record all movement as still images to a folder.
- Trigger vision recognition on any new images in that folder.
More on all that in the security section of the smart cabin retrofit:


100% DIY home automation. From the thermostats to the security cameras, everything we used in designing our home was built on a budget. At the heart is Raspberry Pi home automation with Arduino sensors. Below are all of the IOT projects (networking, software, and hardware) that made this DIY home automation possible.
Results
Using a USB power meter, I tested the Raspberry Pi Zero W’s power consumption. It clocked in at 5v x 0.2a = 1w. This gives the dashcam about a 20 hour lifespan with the battery from the specs. Of course… the van has solar panels and its own internal battery. So in practice, the camera is always running.
Playing around with the location of the camera and the car in the driveway, I’ve been able to detect delivery vehicles and guests as they arrive:

When parked in the driveway, the Raspberry Pis are automatically connected to the WiFi network. This lets me review all security footage from any home computer. Combined with the OBD monitor, we have insight into the van and its surroundings at all times:


 in Home Assistant 4")


