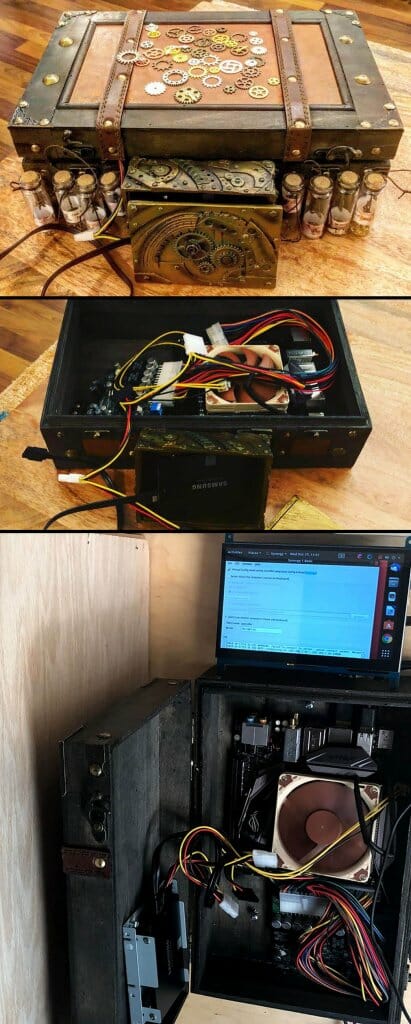
In my quixotic quest for an entirely solar-powered van build, I also created a home automation server like that at my house. I ended up with an energy efficient steampunk computer with the same core specs as an upgraded MacBook Pro… but with only 2/3 of the power requirement, at less than 1/3 the cost.

It’s been a long time since I built a computer. But building computer from scrap parts is exactly what got me interested in the subject at age 11.
I could have simply used a laptop and/or a Raspberry Pi. But I liked the idea of having a relatively powerful Ubuntu server in the van, just as I was accustomed to using at home. Much of my software developer work can benefit from some additional nearby computing power. Plus, designing it as a steampunk computer made it fit in with the rest of the van.
Understanding Computer Power Usage

Many people find power consumption confusing. It’s easy to learn quickly by observing, though. I bought a handy device called a Kill-a-Watt. You just plug it in to the wall, and it keeps track of power usage for anything plugged in to it.
Using this device, I quickly discovered that the LG UltraFine 5k monitor which I had bought for my MacBook Pro (2017 USBC) machine was not entering any kind of sleep mode, drawing a ~1.4 Kwh every day. Perhaps consumption increased when the screens were actually on, but this number was suspiciously high. If I locked the MacBook Pro screen and hooked it up directly to the Kill-a-Watt, its sleep mode drew effectively zero power.
By way of benchmarking, a 15″ MacBook Pro will consume ~45 while fully charged an operating in reasonable bounds. When charging or pushed hard, it can reach ~95 watts.
Steampunk Computer Case & Keyboard
PCPartPicker.com lets you pick parts for a computer, ensure that they are compatible, and even see the power consumption of your build. I began by reading this blog post in order to get some recommendations, but
My system (see part list) came in at a theoretical 99 Watts. It sports an i7 (2.9Ghz quad-core), eventually was upgraded to 32 GB of RAM, and a 256 GB SSD… making it very similar to a ~2018 15″ MacBook pro.
DC Energy Efficient Computers
Since the van is powered by solar and batteries, it’s most efficient to not convert the DC battery power into AC.
I found a company which offers power supply units (PSUs) which consume DC. After chatting with them via email, they recommended the M4-ATX for me. It could provide in the 250 Watts range, so it appeared to be way more than enough for the 151 Watt PC (giving me a little headroom, if I event want to sacrifice some efficiency for more computational power).
Putting the Steampunk Computer Together
Keeping with the steampunk theme of the van, I used a decorative box to house the computer. At one point, I had fairy lights (LEDs) inside the vials you see outside, connected via USB to indicate when the computer is on (I removed these because the van is a small place and light is annoying). The small touchscreen monitor can be used for diagnostic purposes, but in practice I usually ssh in the server from my laptop.

The whole project cost about $750. It consumes about 30 watts in normal operating modes, but can peak up to 99 watts when pushed. Not bad, considering that it’s as powerful as a MacBook Pro for a fraction of the cost.
Steampunk Computer Parts List
Next Steps
This post has focused on the hardware aspects of building an interesting-looking home server. It’s running Ubuntu, and serves as a key part of home automation & network infrastructure. The following posts have more information about how I use my server(s):


Are you able to provide more information on what OS and software you have running on your Steampunk server please? I am very interested in your builds and guides, but do not yet have a clear understanding of what this server has running and its exact purpose.
Thank you.
Hi Russ — thanks for the comment. In this post I focused more on the hardware elements. But I’m running Ubuntu 18.10 at this point. This post has more about the software I run, and this post has more on the networking. Overall, the purpose can be found if you take a look at the Cabin section of the website. There, I’m actively posting about a build-out of an entire smart-home based upon this core tech.
Hope that helps!
– Zane