
Building a DIY Raspberry Pi security camera is much easier than it might sound thanks to open-source security camera software. We use several such cameras placed around the house, as part of our DIY CCTV security camera system.
One such camera is placed at the foot of our driveway at the cabin. It uses the security camera software described in this post to detect cars. Then, it uses our alert system to notify us when a car comes up the driveway. Or when people are at the door.

But first, we need a high resolution camera to hook up to the Raspberry Pi.
High Definition Security Cameras
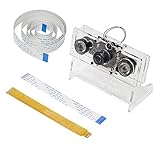
One advantage to using a Raspberry Pi security camera is the ability to choose from many different camera options. There are “official” cameras for the Raspberry Pi, which connect using a ribbon cable. The original v1 option provides a 5mp security camera (1080p). The v2 8mp security camera costs almost three times as much. But even a high resolution security camera is not much use at night.
The best night vision security camera(s) need to automatically switch between day and night mode. The basic NOIR models cannot do this, and therefore will look tinted during the daytime. Unfortunately, most of the day/night cameras are 5mp. Still, as I showed in the DIY dashcam post, these cameras are good enough for our needs.


Dashcams (video cameras in cars) are a great security and safety feature. As with the rest of the vanlife IOT, I built my own DIY dashcam that has some unique features — like motion detection and automatic recording.
Overall, I have had the best luck with the Arducam brand. Their hardware is consistently of high quality and easy to use. In this post, I’ve used their 170 degree fish-eye automatic night switching camera. It also comes in a 130 degree and 100 degree variant. The included case is nice, but unfortunately I ended up not using it, as it is not water-tight.
Aside from the ribbon-cable cameras, it is also possible to use a USB security camera. Just about any webcam or USB camera will work for a Raspberry Pi security camera. This is the approach I took with the DIY smart doorbell, because the camera came with a built-in microphone. For a long range security camera, the Raspberry Pi High Quality Camera can be used with a zoom lens.
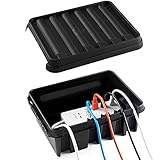
Below, I’ve mounted a night-vision camera inside an all-weather box.

If you're new to Raspberry Pi, the popular CanaKits are a great place to start. I prefer to buy the Raspberry Pi 4, power adapter, micro SD cards, and heatsinks separately. Not only is this cheaper, but it reduces e-waste.
The following are affiliate links to other parts I used in this project. I never link to a product that I have not personally used.
Security Cameras Without Internet
For security cameras that don’t need wifi, the Raspberry Pi can easily become an ethernet security camera. Even without any internet, the software described below can still save to a security camera hard drive. For example, you could use a NAS home server for the footage.
It would also be possible to create a Raspberry Pi security camera with a SIM card. You can simply attach a wireless 4G HAT to create a LTE security camera. Of course, this requires a dedicated SIM card and an active data plan. The exact amount of data used will depend on how you configure the security camera software, below. If you are constantly streaming the feed, it will become expensive quite quickly. However, if you set up an alert system and only download still images when you need them, you’ll only use as much data as you need to.
Raspberry Pi Security Camera with SD Card
The Raspberry Pi uses a micro SD card. This means that any data recorded directly by the Raspberry Pi will be stored on the SD card security camera. As long as you have internet access to the Raspberry Pi, you can connect to it and view the real-time feed or download any footage.
Another option, as mentioned above, is to use a NAS as a security camera hard drive on the same network as the Raspberry Pi. When configuring the file storage, below, you can simply choose the network drive. The advantage to this approach is that the data is not located on the camera itself. Placing the NAS in a different physical location means that even if the security camera is destroyed, you still have the footage.
Security Camera Software
In this post, I’ve shown a driveway security camera. We use it to detect cars:

Once you have MotionEye recording, it’s time to connect to Home Assistant. I built an open-sourced a custom component for Home Assistant which makes this easier:

Home Assistant support for MotionEye cameras limited. I created a custom component with auto-discovery and actions for my pan tilt zoom security camera.
Next, you need to run at least one instance of DOODS. The forum discussion and official docs provide at least one way of going about this. However, I also built a more sophisticated integration which creates a security review feed.

A DIY home security camera is only as good as its ability to detect threats. Our CCTV system can detect people, cars, visitors, and more.
Finally, we use the loudspeaker alert system to play an audio file when a visitor is detected.
Further reading

DIY hidden security cameras can complete a home CCTV system without sacrificing the look of a room. Cheap Arduino parts can be tucked away into a wall, window, or door to easily add a layer of security. Though the resolution may not match higher...
A DIY home security camera is only as good as its ability to detect threats. Our CCTV system can detect people, cars, visitors, and more. Pictures are captured and presented for review.Machine learning filters the data to find interesting objects ...
Home Assistant support for MotionEye cameras limited. I created a custom component with auto-discovery and actions for my pan tilt zoom security camera. You can find the Home Assistant MotionEye component on Github. I've been working on automating...

No silly gimmicks. This collection of home automation ideas will actually make your home more enjoyable for you and your guests. I've personally implemented many of the ideas in this list. These all came from our DIY Home Automation project...
Dashcams (video cameras in cars) are a great security and safety feature. As with the rest of the vanlife IOT, I built my own DIY dashcam that has some unique features — like motion detection and automatic recording. On its surface, this is a post...

Aside from playing music, a multi-room audio system is also capable of becoming a loudspeaker network. Using Home Assistant, it's easy to broadcast audio alerts to the entire household. Playing a Wav File in Home Assistant The simplest approach is...

